Drawing From Concealment Part II: Pull and Rotate
How has your practice been going? You are on your way to becoming a “Master at drawing from concealment”! By practicing the steps taught so far (read part one here) and progressively adding these new skill drills on pulling your gun from the holster, and those to come, the techniques necessary to safely and effectively draw your gun from within your clothing will begin to come naturally and your confidence will grow.
Repetition is key
Odds are you have found a “go-to” holster, the one you wear most often if not all of the time. This is where the idea, same gun, same holster, every day comes in. When you find that holster you love, you get used to the draw and become very proficient at it. You are performing the same movements every day committing them to memory. This lessens the number of changing variables you potentially may have to deal with. You will always have to think about clearing your clothing as you will be wearing different outfits. However, your draw becomes routine. Importantly, the more variety of holsters you use will regularly require ongoing practice and training.
Technique For The Pull
Last week we covered clearing your clothing and getting a good firing grip on your gun. Now let’s move on to the next techniques: pull and rotate.
Once you have effectively cleared your clothing and established a solid firing grip on your gun, you will need to pull the gun from the holster. Before pulling your gun from the holster, make sure you have a solid, stable stance.
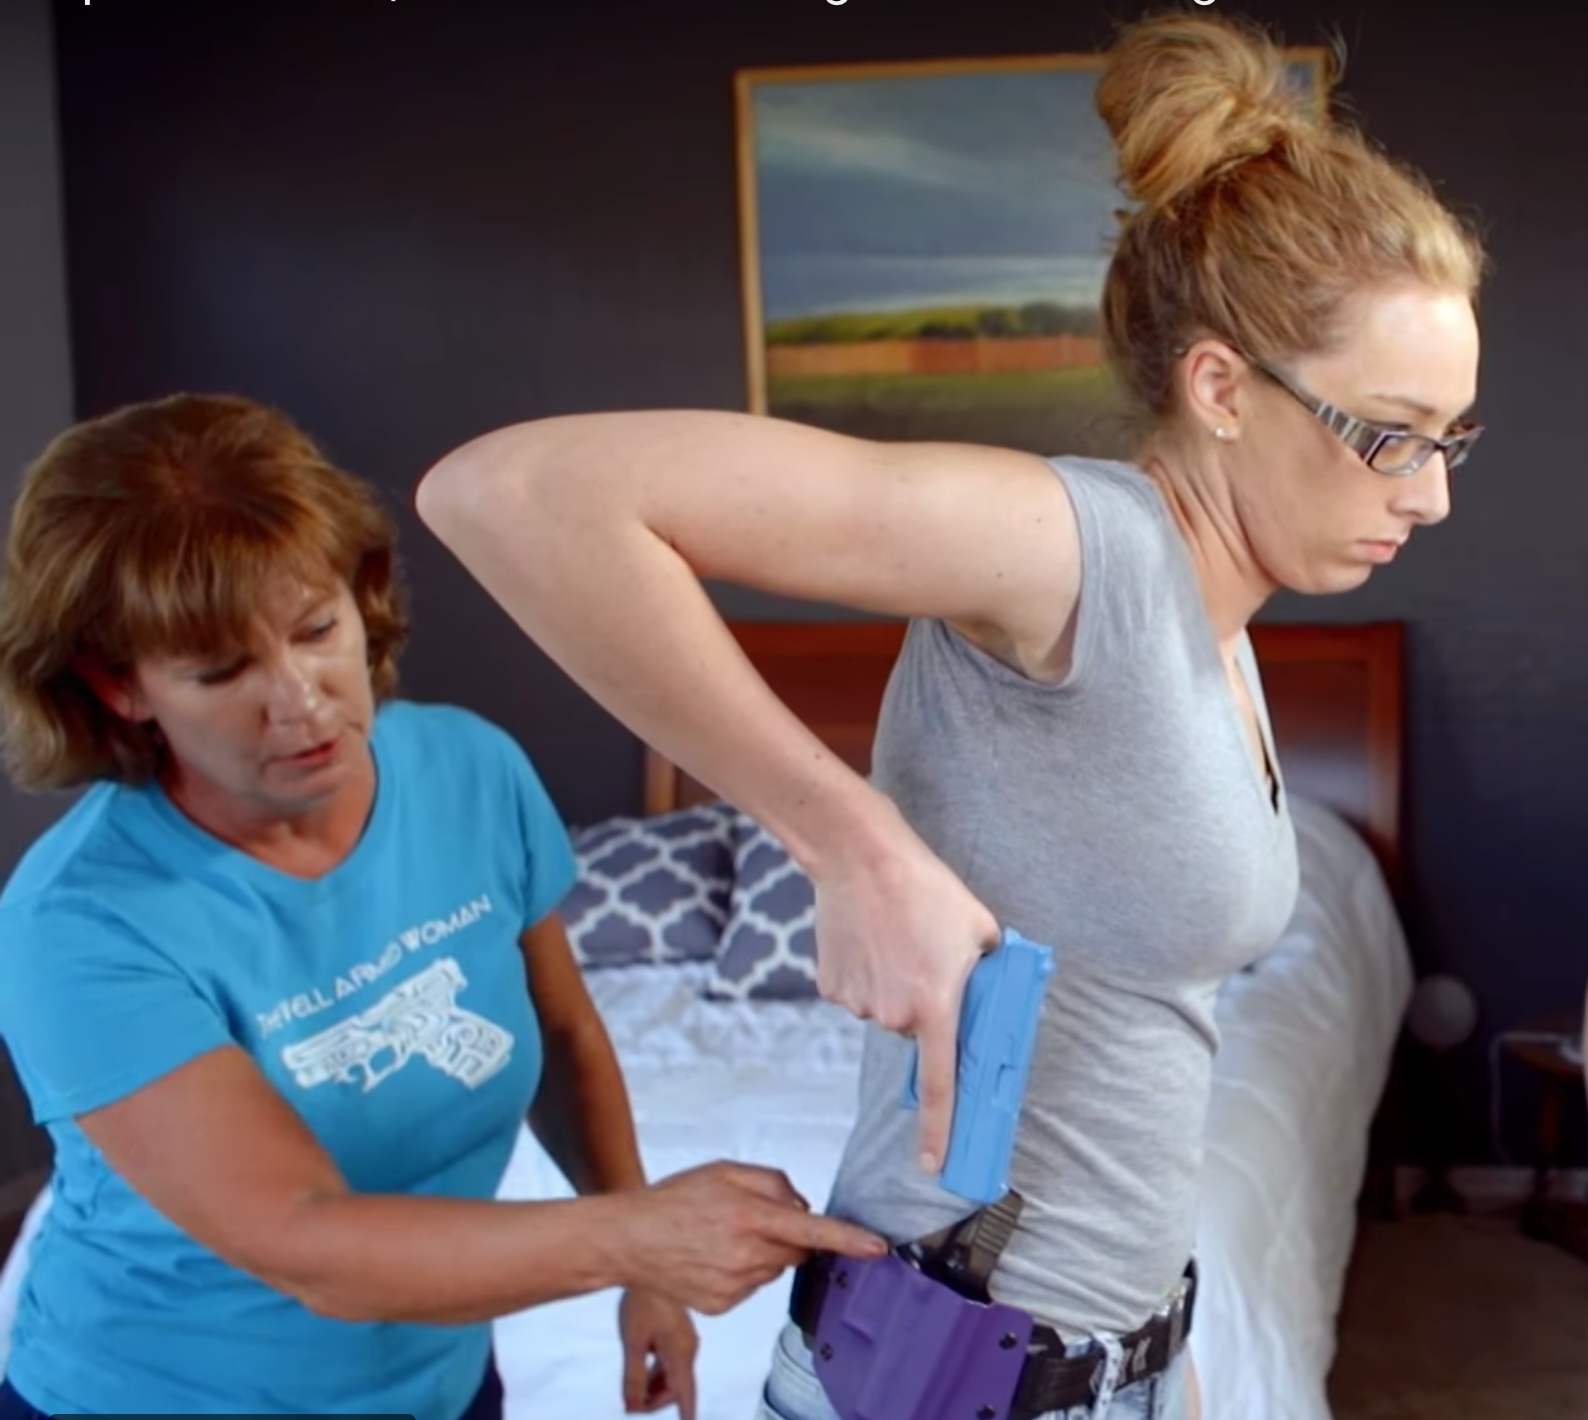
The Pull
While keeping your trigger finger straight and outside of the holster, pull the firearm directly up and completely out of the holster. Your trigger finger needs to remain straight.
Depending on the holster you are wearing and its location, this could be an upward, sideways, or downward pull.


Clear The Holster
This step is not complete until you have pulled the muzzle completely out of the holster fully revealing and clearing the top of the holster. Pull the muzzle of the gun straight up (or out) as high or far as necessary to be above the top of the holster.
An example from IWB leggings

An example from a belly band

Practice Tip - The Pull
With UNLOADED HOLSTERED GUN: (check and double-check your gun including looking into the chamber through the top of the slide, verifying there is no ammunition in the barrel, no ammunition in the magazine and none in the room before doing any practice)
Please see more information on safely practicing with your firearm in this article: Dry-fire Practice For The Woman Shooter
Practice pulling your gun from your holster every day as you get dressed for the day. It is important to practice the different pull motions for all your clothing styles and the different holster options you use. You will need to get a feel for how high/far you need to pull to clear your holster and clothing.
Stand in front of a mirror to perform this practice.
You can also record yourself on your phone and re-watch your technique or ask someone to watch you from the side.
Begin with the clothing clearing steps we discussed last week
Watch yourself clear the clothing and get a solid grip on your gun. Next, slowly pull the gun from the holster watching yourself closely to verify that the muzzle of the gun is pulled or raised high enough to completely clear the holster and you are not pointing the gun at any part of your body.
Do this repeatedly and daily to become confident in the force and distance necessary while confirming this motion in the mirror. As your skill improves, increase the decisiveness and speed of your pull.
This is an especially important skill to master. If at any point during your draw when your life depends on it, if the gun gets caught up in the holster or in your clothing, it could have disastrous results.
Technique For Rotating The Gun On Target
At this point, your gun is safely out of your holster, your trigger finger is straight and on the slide of the gun, but your muzzle of your gun is NOT on your target. The gun must be rotated so that the muzzle now points “downrange” and on your intended target. The key to this step is two-fold.
First you want this to be an efficient motion to get the muzzle pointed in the right direction as quickly as possible.
Secondly, you need to do so without the gun pointing at either yourself or an innocent bystander.
Depending on where you have just pulled your gun from, the orientation of this step may differ. Most often, you will be pulling your gun from somewhere on your mid-section, with the muzzle pointing downwards.
Next
Rotate your wrist and lower your elbow of your firing arm. Point the muzzle of your gun downrange at your target. Try to keep your elbow as close to your body as possible to streamline the motion to make it as efficient and quick as possible.

In a life-or-death situation, there is not time for “extra” unnecessary movements.
Note
If you utilize a manual safety feature, it is at this point that you will disengage them. Practice disengaging your safety after every rotation. Every single fraction of a second count when your life is on the line. It is imperative that if you use a safety feature, you are able to disable it immediately after your muzzle is on target as you begin to extend the gun into firing position. We will cover the technique of the extension next week.
Practice Tip For Rotating The Gun On Target
You will want to practice this rotate motion over and over. Watch yourself and keep an eye on your elbow. Try to keep it as close to your body as possible to streamline the motion. Is your muzzle in a safe direction as you transition from the pull and rotate the gun?
As you begin to put all of these steps together you want to see a smooth, movement without stopping in-between steps.
To Recap
To recap, we have covered the techniques of clearing your clothing to be able to have direct access to and attaining the proper grip on your gun in its holster. Followed by drawing (pulling) your gun from the holster ensuring you have enough space to rotate the gun without getting caught up with the holster. These are the important steps to practice with each clothing/holster combination you wear.
Do You Want More?
Are you enjoying this type of instruction? I suggest you check out The Well Armed Woman’s Online Concealed Carry course. Most of these images and short video clips came right from that course!
Topics Taught:
- What is Concealed Carry?
- Concealed Carry Mindset and Concealed Carry Confidence
- Woman’s Personal Concealed Carry System and Concealed Carry Locations
- Drawing from Concealment
- Holsters for Women
- Dressing for Concealed Carry
- Concealed Carry Laws & Concealed Carry Insurance
- Training & Practice